


-
To connect your device email to HISD:1) Go to your devices mail setting and choose the Exchange or Microsoft Exchange option2) Use default mail name and use the following key setting names for your setupApple:1.Tap on the Settings icon from the home screen.2.Scroll down and tap on Mail, Contacts, Calendars.3.Tap Add Account in the Accounts sections.4.Choose Exchange from the available of accounts.5.Enter your email address and password when it is prompted. After that tap Next in the top right corner to continue.6.Ticks flash up onscreen will appear if the account set up to tell your information was accepted.7.This will then automatically move on to a screen with switches so you can choose what information that account will bring to your new iPhone – Mail, Contacts, Calendars, and maybe other items too, depending on the account. Turn off switches for any items you don’t wish to be on your iPhone before tapping on Save.Android:
 Contact the Exchange / IT administrator for assistance with server information and credentials. Account synchronization can take several minutes. The Corporate Calendar (Menu > Corporate Calendar) must be started to initialize the calendar.
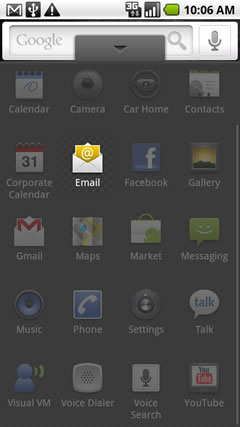
- From the home screen, select the applications tab (located at the bottom of the display).
- Select Email.
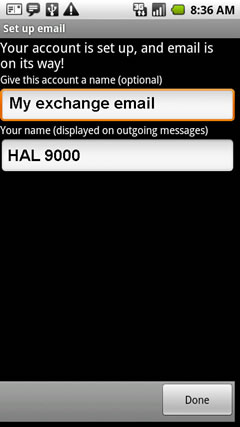
First email account added
- Enter the exchange email address and password then select Next.

- Select Exchange account.
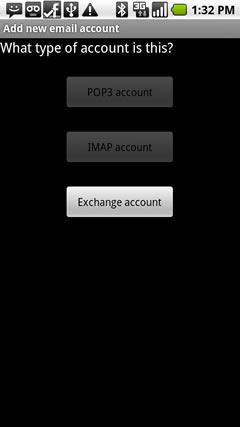
- Enter the exchange server settings in the appropriate fields:
- Domain\Username
- Password
- Exchange Server
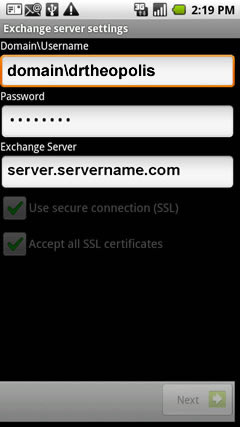
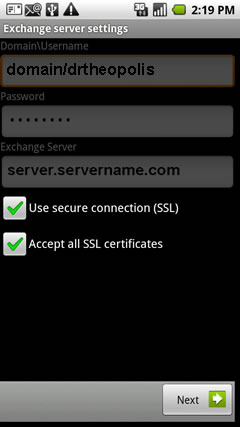
- If desired, ensure Use secure connection (SSL) and Accept all SSL certificates are checked then click Next.
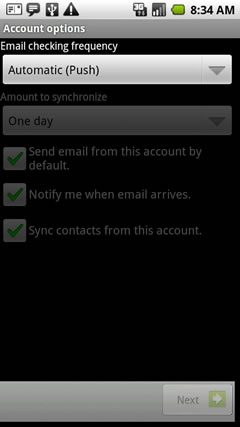
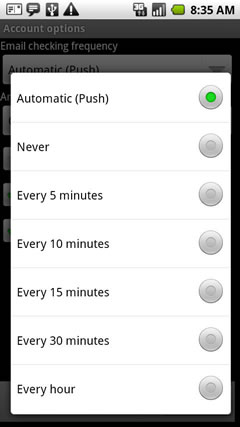
- Select the Email checking frequency dropdown.
- Select the desired frequency.
- Select the Amount to synchronize dropdown.
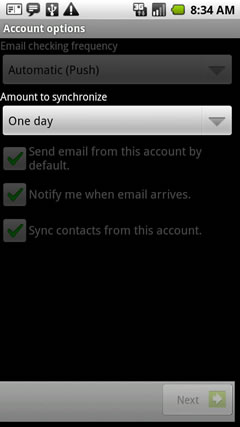
- Select the desired amount.

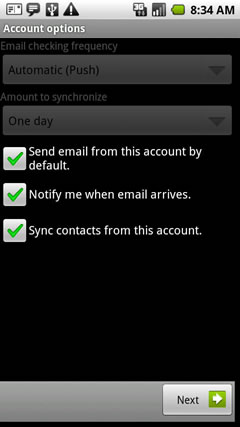
- Select the desired account options then select Next.
 The account option is enabled if a green check mark is present.
 - Send email from this account by default.
- Notify me when email arrives.
- Sync contacts from this account.
- Enter an account name and outgoing message name then select Done.
Addtional Email account added
- Select Menu.

- Select Accounts.
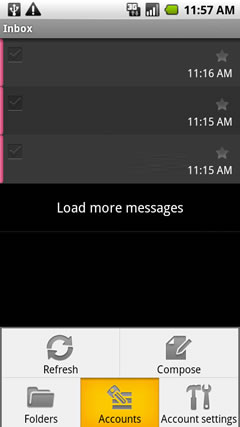
- Select Menu.
- Select Add account.

- Enter the exchange email address and password then select Next.
- Select Exchange account.
- Enter the exchange server settings in the appropriate fields.
- Domain\Username
- Password
- Exchange Server
- If desired, ensure Use secure connection (SSL) and Accept all SSL certificates are checked then click Next.
- Select the Email checking frequency dropdown.
- Select the desired frequency.
- Select the Amount to synchronize dropdown.
- Select the desired amount.
- Select the desired account options then select Next. The account option is enabled if a green check mark is present.
- Send email from this account by default.
- Notify me when email arrives.
- Sync contacts from this account.
- Enter an account name and outgoing message name then select Done.
- From the home screen, select the applications tab (located at the bottom of the display).
Select a School...
Select a School
- Alcott Elementary School
- Almeda Elementary
- Alternative Certification Program
- Anderson Elementary School
- Arabic Immersion Magnet School (AIMS)
- Ashford Elementary
- Askew Elementary School
- Atherton Elementary
- Attucks Middle School
- Austin High School
- Baker Montessori
- Barbara Bush Elementary
- Barbara Jordan Career Center
- Barrick (C. E.) Elementary
- Bastian Elementary School
- Baylor College of Medicine Academy at James D Ryan MS
- Baylor College of Medicine Biotech Academy at Rusk
- Bellaire High School
- Bellfort Early Childhood Center
- Benavidez Elementary
- Benbrook Elementary
- Berry Elementary
- Billy Reagan K8 Educational Center
- Frank Black Middle School
- Blackshear Elementary
- Bonham Elementary School
- Bonner Elementary
- Braeburn Elementary
- Briargrove Elementary School
- Briarmeadow Charter
- Briscoe Elementary
- Brookline Elementary
- Browning Elementary
- Bruce Elementary
- Burbank Elementary
- Burbank Middle
- Burrus Elementary
- Cage Elementary
- Career Readiness
- Carnegie Vanguard High School
- Carrillo Elementary
- Challenge Early College High School
- Clemente Martinez Elementary School
- Clifton Middle School
- Codwell Elementary
- Community Services
- Condit Elementary
- Coop Elementary
- Cornelius Elementary
- Crespo Elementary
- Crockett Elementary School
- Cullen Middle School
- Cunningham Elementary
- César E. Chavez High School
- Daily, Ray K. Elementary
- David G. Burnet Elementary
- Davila Elementary
- De Chaumes Elementary
- De Zavala Elementary
- Deady Middle School
- DeAnda Elementary School
- Distrito Escolar Independiente de Houston
- Dogan Elementary School
- Durham Elementary
- Durkee Elementary
- East Early College High School
- Eastwood Academy
- Edison Middle School
- Elementary DAEP
- Eliot Elementary School
- Elmore Elementary School
- Elrod Elementary School
- Emerson Elementary
- Energized for Excellence
- Energy Institute High School
- McGowen Elementary
- Farias ECC
- Cook Elementary
- Field Elementary School
- Fleming Middle School
- Foerster Elementary
- Fondren Elementary
- Fondren Middle School
- Fonville Middle School
- Fonwood Early Childhood Center
- Forest Brook Middle School
- Franklin Elementary
- Frost Elementary
- Furr High School
- Gabriela Mistral CEC
- Gallegos Elementary
- Garcia Elementary School
- Garden Oaks Montessori
- Garden Villas Elementary
- Golfcrest Elementary
- Gregg Elementary
- Gregory-Lincoln Education Center
- Gross Elementary
- Halpin Early Childhood Center
- Hamilton Middle School
- Harper DAEP High School
- Harris (John R.) Elementary
- Harris (Roland P.) Elementary School
- Hartman Middle School
- Hartsfield Elementary School
- Harvard Elementary School
- Health and Medical Services
- Heights High School
- Helms Elementary School
- Herod Elementary School
- Herrera Elementary School
- High School Ahead Academy Middle School
- High School for Law and Justice (HSLJ)
- Highland Heights Elementary
- Hilliard Elementary School
- Hines Caldwell Elementary School
- HISD Benefits
- HISD Human Resources
- HISD Miles Ahead Scholars
- HISD School Choice
- HISD School Website Resources
- Hobby Elementary School
- Hogg Middle School
- Holland Middle School
- Horn Elementary
- Houston Academy for International Studies
- Isaacs Elementary
- J.P. Henderson Elementary
- Long Academy
- Janowski Elementary
- Jefferson Elementary School
- John G. Osborne Elementary
- Jones Futures Academy
- Kashmere Gardens Elementary Fine Arts Magnet
- Kashmere High School
- Kate Bell Elementary
- Smith, K. Elementary
- Kelso Elementary
- Kennedy (John F.) Elementary
- Ketelsen Elementary
- Key Middle School
- Kinder High School for the Performing and Visual Arts
- Kolter Elementary
- Lamar High School
- Lanier Middle School
- Lantrip Elementary
- Las Americas
- Laurenzo Early Childhood Education Center
- James H. Law Elementary
- Lawson Middle School
- Lewis Elementary
- Liberty High School Homepage
- Lockhart Elementary School
- Longfellow Elementary School
- Looscan Elementary
- Love Elementary School
- Lovett Elementary School Fine Arts Magnet
- Lyons Elementary School
- Mabel B. Wesley Elementary School
- MacGregor Elementary School
- Mading Elementary STEM Academy
- Madison (James) High School
- Mandarin Immersion
- Marcellus Elliot Foster Elementary
- Twain (Mark) Elementary
- Mark White Elementary School
- Marshall Middle Academy of Fine Arts
- Martin Luther King, Jr. Early Childhood Center
- McNamara Elementary
- McReynolds Middle School
- Medicaid Finance & Consulting Services
- Memorial Elementary
- Meyerland Performing and Visual Arts Middle School
- DeBakey High School for Health Professions
- Mickey Leland College Preparatory Academy for Young Men
- Gulfton
- Middle College at Felix Fraga
- Milby High School
- Milne Elementary School
- Mitchell Elementary School
- Montgomery Elementary
- Moreno, Joe E. Elementary
- Henderson Elementary School
- Neff Early Learning Center
- Neff Elementary School
- North Forest High School
- North Houston Early College HS
- Northline Elementary
- Northside High School
- Oak Forest Elementary School
- Oates Elementary
- Ortiz Middle School
- Paige Elementary
- Park Place Elementary School
- Parker Elementary
- Henry Middle School
- Patterson Elementary
- Paul Revere Middle School
- Peck Elementary
- Pershing Middle School
- Petersen Elementary
- Pilgrim Academy
- Pin Oak Middle School
- Piney Point Elementary School
- Pleasantville Elementary School
- Poe Elementary
- Port Houston Elementary School
- Project Chrysalis Middle School
- Pugh Elementary
- Raul Martinez Elementary
- Red Elementary
- Redesign
- Reynolds Elementary
- River Oaks Elementary IB World School
- Roberts Elementary
- Robinson Elementary
- Rodriguez, Sylvan Elementary
- Roosevelt Elementary
- Ross (Betsy) Elementary School
- Rucker Elementary
- Sam Houston Math, Science and Technology Center
- Sanchez Elementary
- Scarborough Elementary
- Scarborough High School
- Scroggins Elementary School
- Secondary DAEP
- Seguin Elementary
- Shadowbriar Elementary
- Shadydale Elementary School
- Sharpstown High School
- Sharpstown International School
- Shearn Elementary School
- Sherman Elementary School
- Sinclair Elementary School
- South Early College High School
- Southmayd Elementary School
- Sterling Aviation High School
- Stevens Elementary
- Stevenson Middle School
- Student Supports
- Students
- Sugar Grove Academy Middle School
- Sutton Elementary
- T.H. Rogers School
- Tanglewood Middle School
- Texas Connections Academy at Houston
- Texas Education
- The Rice School La Escuela Rice
- The School at St George Place
- Thomas Middle School
- Thompson Elementary
- Thurgood Marshall Elementary School
- Tijerina Elementary
- Tinsley Elementary
- Travis Elementary School
- Valley West Elementary
- Virgil I. Grissom Elementary School
- Wainwright Elementary
- Walnut Bend Elementary
- Waltrip High School
- Washington High School
- Welch Middle School
- West Briar Middle School
- West University Elementary School
- Westbury High School
- Westside High School
- Wharton Dual Language Academy
- Wheatley High School
- Whidby Elementary
- White (Ed) Elementary
- Whittier Elementary School
- Williams Middle School
- Windsor Village Vanguard Magnet Elementary
- Wisdom High School
- Woodson PK-5 Leadership Academy
- Worthing High School
- Yates High School
- Navarro Middle School
- Young Elementary
- Young Scholars Academy for Excellence
- YWCPA

