TASFA Step-by-Step Process
Click each step below for detailed instructions.
Overview
The TASFA Process
 |
Texas Colleges: FAFSA/TASFA Priority Deadlines |
Resources:
- TASFA Checklist
- For a sampling of Priority Deadlines
- For More Information about SB1528
- For Affidavit of Residency
| Step 01: | Gathering Documents |
| Step 02: | Completing the TASFA and checking your (EFC). |
| Step 03: | Follow up after TASFA submission and Verification. |
| Step 04: | Accepting your Award Letter. |
If you have a social security number, you should enter it. However, if you do not have one, then enter all 0’s. Do NOT enter your Tax ID# ]TIN] unless this is given as an option.
For many colleges, the priority deadline is March 15 but for some schools it’s as early as March 1. Check your college’s financial aid website to find when its financial aid priority deadline. Because the Texas Grant is limited, it is essential for you to meet your college’s priority deadline to maximize your chance to receive this generous grant.
Are you ready?
Click on the "Next" button below and lets get started!
Gathering Documents
Step 1: Gathering Documents
Do I have to Provide My Parents Tax Information on the TASFA? Click image to enlarge.

Selective Service Resources:
- Application for selective service registration.
- Information on contacting selective service.
The following information is needed to complete your TASFA:
| DOB for you and your parents. |
| Your family’s 2016 tax returns (1040) and W-2 |
| Tax Transcript of Parents’ 2016 tax returns. |
| Males 18 to 25 [Verification of Selective Service] |
Colleges understand this and they expect your parents to file an income tax. However, if your parents do not file an income tax, your college’s financial aid office might ask for a letter from your parent’s employer stating their income for last year.
However, if your parents are required to submit a tax returns then you will need them to submit their taxes; otherwise, you risk not having your TASFA processed.
Complete the TASFA
Step 2: Completing your TASFA
Download a TASFA application.
| English Version | Spanish Version | |
|
|
There are 7 parts of a TASFA Application. Click each step for important hints on completing the TASFA
- For College Student ID#, do not enter your high school ID. Every college you apply to will send you an email or letter within two weeks of applying with your College Student ID#.
- You will have a different ID# for each college you apply to.
- If you do not receive your college student ID#, you can call the office of admission and request it.
- If you do NOT live with your parents, talk with your high school counselor to see if you qualify as a [unaccompanied youth who was homeless]. This does not necessarily mean that ‘you live under a bridge’. The Federal Government has a broad definition of who is an unaccompanied youth. Generally if you are living with someone who is not your parents you can be classified as an unaccompanied youth.
- This is important because you are required to supply your parents’ tax information unless you can answer YES to one of these question or qualify for what is called a Dependency Override.
- If you feel you qualify as an ’unaccompanied youth’, you MUST ask your counselor to direct you to your high school’s homeless liaison officer. This person will ask you a couple of questions about your living situation, and have you complete a simple application.
- Once you are classified as an ‘unaccompanied youth’, you will need to make sure the college financial aid office knows this. They will confirm your status with your high school.
This could include relatives who live back in your home country, who you support.
- A dislocated worker is someone who has lost his/her job the past 12 months. While you can indicate that your parents “will file” their income taxes, your TASFA will not be processed until you have submitted your parents’ tax returns and tax transcript. (or) income verification.
- To receive full grant funding you will need to be at least a 3/4 time student, which generally means you are taking at least 3 classes per semester.
- If you turn in your parents’ tax returns/transcript, you will most likely put 0’s on all question under this section.
- However, if you are NOT living with your parents and you are being supported by a relative or someone else (spouse) you will need to fill out [Money you received (or bills someone else paid for you)]. Often times your college’s financial aid office will ask you to itemize (break-down) your monthly expenses and explain who is supporting you.
You MUST speak with your financial aid office to find out EXACTLY what they wish you to turn in with your TASFA. One college might want one thing and another something else.
Follow up/Verification
Step 3: Follow Up and Verification
Make sure to:
- Make a copy of each TASFA Application you submit with all supporting documents. If a financial aid office misplaces ‘loses’ your TASFA application you won’t have to ‘scramble’ to repackage your application.
- Keep a notebook of when you turn items in and who you talk with. If you run into problems later, you will have a DOCMENTED trail that you have been trying to do everything correctly.
- It is crucial that you ask each financial aid office “WHO IS THE FINANCIAL AID OFFICER IN CHARGE OF SB 1528 TASFA STUDENTS”. Most colleges have ONE person who is responsible for this, and it is essential that you get to know this person.
- You will most likely need to call or visit with him or her several times. You want the financial aid officer over TASFA to know your name.
- Verification is a process in which colleges are asked to ‘verify’ or check that the information you supplied is correct. All SB 1528/TASFA students are ‘flagged’ for verification.
- All this means is that you have to supply to the financial aid office your parents’ tax returns/tax transcript (or proof of income) along with the verification worksheet
- You pick this up at your financial aid office (or)
- You can download it from your college’s financial aid website. Always complete the verification worksheet for the year you will start college not the current year!
- Verification sheets ask for your parents’ income or source of financial assistance, such as social security benefits. You and your parents will need to sign the worksheet and you MUST turn them back in to receive financial aid!
Your Award Letter
Click below to understand an award letter.
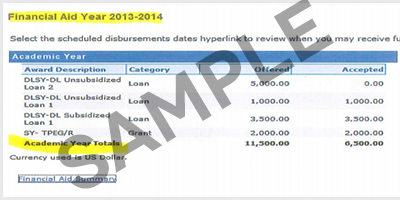
Step 4: Accepting your Award Letter
- A college might send you an award letter by mail, but most likely the college will expect you to log into your financial aid account and review your award letter online.
- You should expect your award letter 4 to 8 weeks after your TASFA has been processed. After your TASFA has been submitted and processed, you should immediately become familiar with your college’s financial aid website.
- If you do not receive an email from your college’s financial aid office in 4 weeks, you should contact them and find out why you have not received an award letter. It might be you made a mistake or they just might be behind.
- Unfortunately, many state colleges do not award TASFA students until late summer. It’s a good idea to ask the financial aid office if they have an ‘emergency tuition loan program.
- This is a short term loan from the colleges (generally until your financial aid is processed).
- You will have to pay a small fee.
First, if you do not accept your award letter the college will assume you do not want financial aid. In other words, you won’t get any money!
So, make sure to log into your college financial aid account and go to a section (generally called) award letter or accept award offers. You will have the opportunity to accept or not accept your financial aid.
- Once you accept your financial aid, you will be able to pay for your classes with your financial aid..
- You will also receive a college debt card, which will allow you to pay for books.
- When you register for classes (sign up), you will be asked how do you wish to pay. You can apply your financial aid at this point.